過去にQiitaに投稿した内容のアーカイブです。
前回までで、Bedrockと会話ができるチャットアプリを公開することまでできました。
まだまだ機能的に不十分なところがあるので、開発していきます。
目次
- 新年なのでLLMとのチャットアプリをイチから作ってみた①
- 新年なのでLLMとのチャットアプリをイチから作ってみた②
- 新年なのでLLMとのチャットアプリをイチから作ってみた③ ←このページ
会話の履歴を覚えてやり取りがしたい
BedrockのAPI呼び出しはステートレスでそれぞれ独立しています。そのため、直前までのやり取りを保持して会話がしたい場合は、過去のやり取りをすべてプロンプトに含める必要があります。
例として一回会話したあとのプロンプトは以下のような内容を送ります。
Human:
H: こんにちは
A: こんにちは。日本語でお話ししましょう。

富士山の高さは?

Assistant:
Claude村のしきたりにより人(自分)の入力は「H:」、Claudeの回答は「A:」ではじめます。
これを実現するために、コードを変更しました。
chatHistoryを定義します。
type chat = {
  prefix: string;
  message: string;
};

let chatHistory: chat[] = [];
プロンプトを変更し、chatHistoryの内容を反映します。
const history = chatHistory
  .map((x) => `${x.prefix}: ${x.message}`)
.join("\n");prompt: `\n\nHuman: \n${history}\n\n${prompt}\n\nAssistant:`,Bedrockから回答を、chatHistoryに追加します。
const completion = JSON.parse(response.body.transformToString("utf-8"))[
  "completion"
];

chatHistory = [
  ...chatHistory,
  {
    prefix: "H",
    message: prompt,
  },
  {
    prefix: "A",
    message: completion,
  },
];
これで直前のやり取りを含めた会話ができるようになりました。

- ソースコード全体
https://github.com/moritalous/skeleton-chat/blob/main/src/routes/v3-chathistory/%2Bpage.svelte
回答をChatGPTみたいにカタカタさせたい
Bedrockの呼び出しに使っているInvokeModel APIは、生成が全て完了してからレスポンスを受け取ります。
ChatGPTのようにストリーミングで少しずつ表示をするために、InvokeModelWithResponseStreamを使うように変更します。
2024/01/07時点でAPI Gatewayはストリーミングレスポンスに未対応です。 Amplifyを使う事により、API Gatewayを使用しない構成にしたため、実現できました。
InvokeModelWithResponseStreamの使い方
まず、InvokeModelWithResponseStreamの使い方からです。 リクエストを送信してresponseを受け取るところまではInvokeModelとほぼ同じです。
const client = new BedrockRuntimeClient({
  region: amplifyconfig.aws_project_region,
  credentials: (await fetchAuthSession()).credentials,
});

const params = {
  modelId: "anthropic.claude-instant-v1",
  contentType: "application/json",
  accept: "*/*",
  body: JSON.stringify({
    prompt: `\n\nHuman: ${prompt}\n\nAssistant:`,
    max_tokens_to_sample: 1000,
    temperature: 0.5,
    top_k: 250,
    top_p: 1,
    stop_sequences: ["\n\nHuman:"],
  }),
};

const command = new InvokeModelWithResponseStreamCommand(params);
const response = await client.send(command);
responseを受け取ってからの処理はこのようになります。ちょっとずつ取得できるので、取得済みの文字列と連結していきます。
let completion = "";
if (response.body) {
  const textDecoder = new TextDecoder("utf-8");

  for await (const stream of response.body) {
    const chunk = textDecoder.decode(stream.chunk?.bytes);
    completion = completion + JSON.parse(chunk)["completion"];
    console.log(completion)
  }
}
console.log(completion)の結果をキャプチャしたものがこちらです。
さて、これをチャット画面に反映するにはどうしたらいいでしょうか。
いろいろ試行錯誤した結果、今までのチャット欄と別に「 カタカタしてるときだけ表示されるチャット欄 」を用意するのが一番良さそうでしたので、この方法を紹介します。
AIの発言と同じフォーマットで、カタカタ専用エリアを用意します。 チャットのやり取りの末尾に置きます。(わかりやすいように赤色にしています)

invokeBedrock関数内に宣言していた
completion変数を関数の外に移動します。カタカタ専用エリアは
completion変数の値をリアクティブに反映させます。こうすることで、カタカタ文字が赤いエリアに出力され、全てが完成したタイミングで緑の吹き出しが現れます。

Bedrock呼び出しの前後で
completion変数をブランクにします。そして、completion変数がブランクのときは赤い吹き出しは非表示にします。 こうすることで、入力途中が赤色で、確定したら緑色になったように見えます。
- ソースコード全体
https://github.com/moritalous/skeleton-chat/blob/main/src/routes/v3-streaming/%2Bpage.svelte
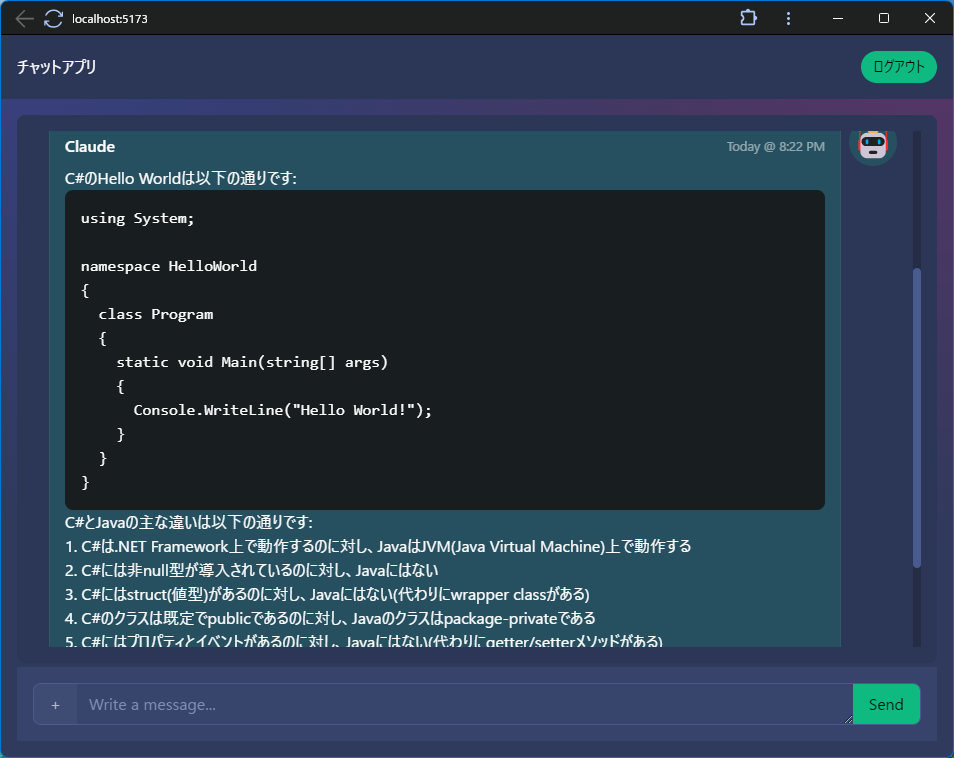
箇条書きやコードの出力をいい感じで見せたい
回答をただの文字列として表示しているだけなので、箇条書きになったり、Codeブロックがおしゃれに黒背景になったりしません。
markedというライブラリーを使って、おしゃれでスタイリッシュな回答に仕上げたいと思います。
https://github.com/markedjs/marked
ライブラリーをインストールします。
npm i markedライブラリーをインポートします。
import { Marked, type RendererObject } from "marked";タグの変換設定を追加
markedがHTMLタグの変換はしてくれるのですが、class指定がなく、このままではスタイルが適用されません。そのため、クラスを明示的に指定するようにカスタマイズします。
const renderer: RendererObject = {
  code(code: string, infostring: string | undefined, escaped: boolean) {
    return `<pre class="pre"><code>${code}</code></pre>`;
  },
  list(body: string, ordered: boolean, start: number | "") {
    if (ordered) {
      return `<ul class="list-disc list-inside">${body}</ul>`;
    } else {
      return `<ol class="list-decimal list-inside">${body}</ol>`;
    }
  },
  listitem(text: string, task: boolean, checked: boolean) {
    return `<li class="list-item"><span>${text}</span></li>`;
  },
};注記今回はコードブロックと箇条書きのスタイルのみ対応しました。
カスタマイズを適用したmarkedを生成します。
const marked = new Marked({ renderer });値を出力する部分にmarkedを反映します。
@htmlをつけるとHTMLとして扱ってくれるようです。参考:Special tags
- <p>{bubble.message}</p>
+ <p>{@html marked.parse(bubble.message)}</p>
完成しました!
- ソースコード全体
https://github.com/moritalous/skeleton-chat/blob/main/src/routes/v3-format/%2Bpage.svelte
会話履歴をずっと保持したい
Bedrockと会話履歴を考慮したやり取りはできるようになりましたが、ブラウザを開き直すとまたいちからのやり取りになってしまいます。
AmplifyのAPI (GraphQL)を使い、会話履歴をAWSに永続化します。
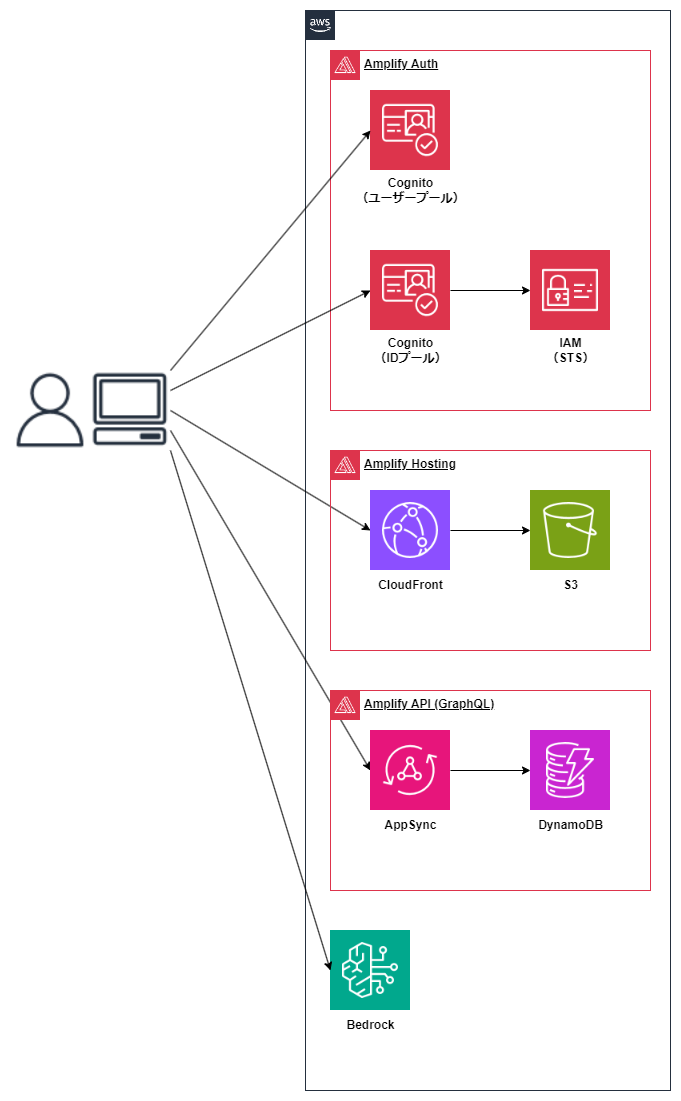
API (GraphQL)はデータストアとしてDynamoDBを利用します。
Amplify APIを追加します。
amplify add apiChoose the default authorization type for the APIを
Amazon Cognito User Poolに変更します。? Select from one of the below mentioned services: GraphQL
? Here is the GraphQL API that we will create. Select a setting to edit or continue Authorization modes: API key (defa
ult, expiration time: 7 days from now)
? Choose the default authorization type for the API Amazon Cognito User Pool
Use a Cognito user pool configured as a part of this project.
? Configure additional auth types? No
? Here is the GraphQL API that we will create.GraphQLスキーマを更新します。
amplify/backend/api/myskeletonapp/schema.graphqlを編集します。 サンプルのTodoスキーマがありますが、一度全部消して、以下に変更します。type Chat @model @auth(rules: [{ allow: owner }]){
userId: ID! @primaryKey(sortKeyFields: ["timestamp"])
timestamp: String
chatid: String!
chathistory: String!
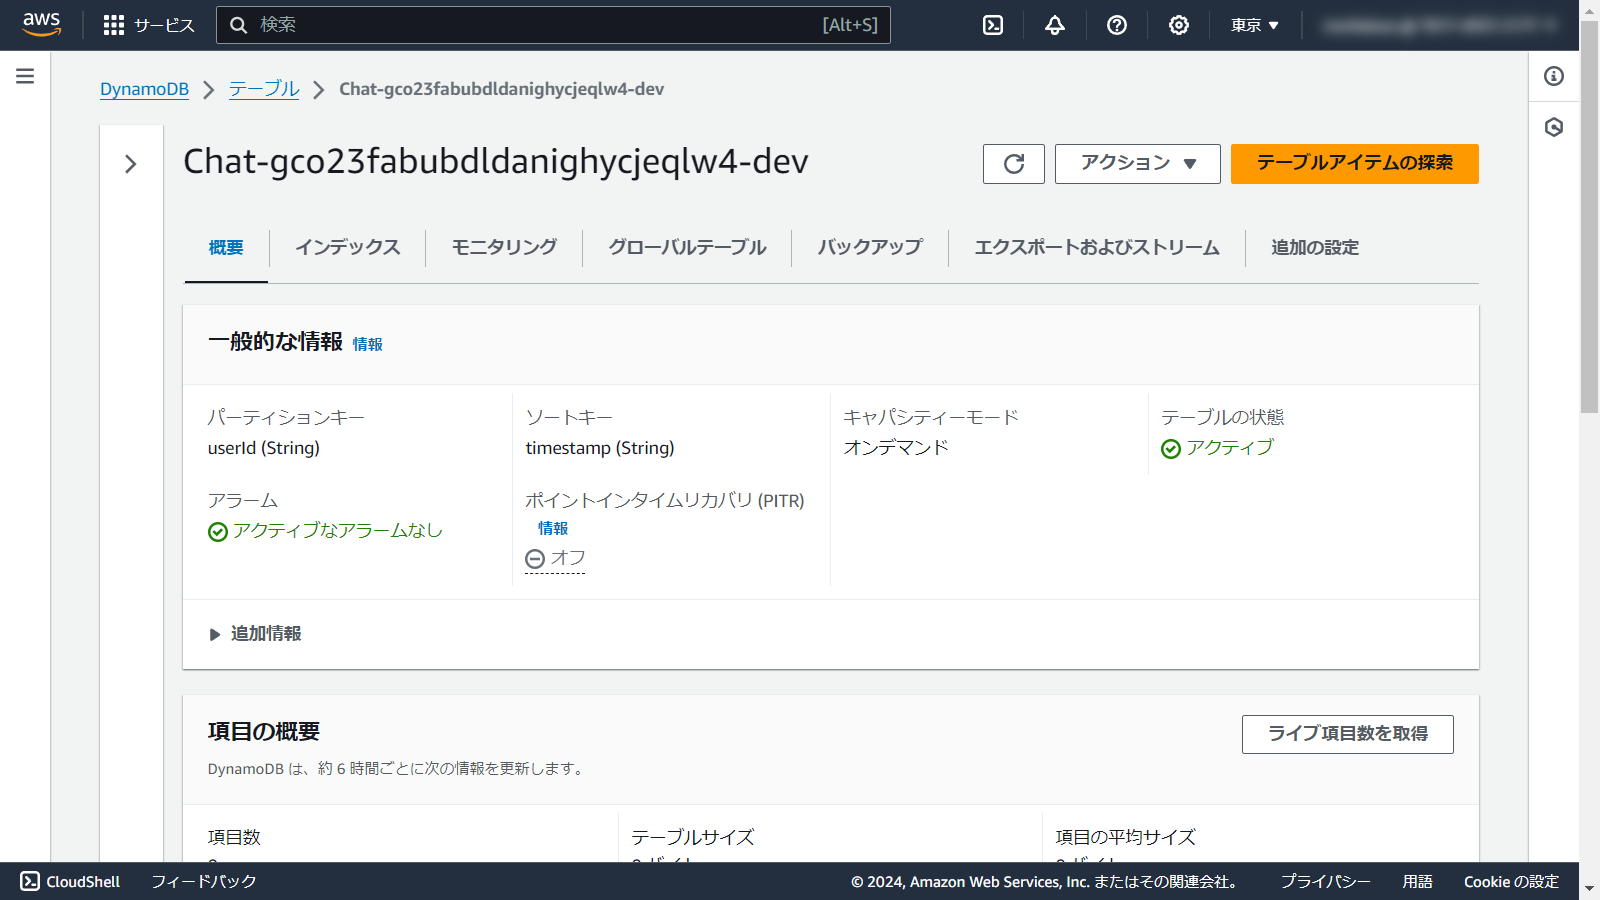
}注記DynamoDBにプライマリーキーがuserId、ソートキーがtimestampのテーブルをイメージしました。
AWSに反映します。
amplify push処理の途中で、GraphQLスキーマを元にコード生成が行うか聞かれるので、Yesで回答します。
? Do you want to generate code for your newly created GraphQL API Yes
? Choose the code generation language target typescript
? Enter the file name pattern of graphql queries, mutations and subscriptions src/graphql/**/*.ts
? Do you want to generate/update all possible GraphQL operations - queries, mutations and subscriptions Yes
? Enter maximum statement depth [increase from default if your schema is deeply nested] 2
? Enter the file name for the generated code src/API.ts
amplify pushが完了すると、以下のソースコードが生成されました。- src/graphql/mutations.ts
- src/graphql/queries.ts
- src/graphql/schema.json
- src/graphql/subscriptions.ts
- src/API.ts
また、DynamoDBにテーブルが作成されました。
続いてプログラムを修正します。
import文を追加します。
import { generateClient } from "aws-amplify/api";
import { ModelSortDirection } from "../API";
import { createChat, updateChat } from "../graphql/mutations";
import { listChats } from "../graphql/queries";
GraphQLのクライアントを生成します。
const apiClient = generateClient();GraphQLにデータを永続化するコードを追加します。
GraphQLのAPIはこのように使用します。
データ登録
const user = await getCurrentUser();
const unixTimestamp = Math.round(new Date().getTime() / 1000);
const uuid = crypto.randomUUID();

await apiClient.graphql({
  query: createChat,
  variables: {
    input: {
      userId: user.userId,
      timestamp: unixTimestamp.toString(),
      chatid: uuid.toString(),
      chathistory: JSON.stringify(messageFeed),
    },
  },
  authMode: "userPool",
});
データ取得
const user = await getCurrentUser();

const chats = await apiClient.graphql({
  query: listChats,
  variables: {
    userId: user.userId,
    limit: 1,
    sortDirection: ModelSortDirection.DESC,
  },
  authMode: "userPool",
});

if (chats.data.listChats.items.length > 0) {
  const chat = chats.data.listChats.items[0];
}
データ更新
await apiClient.graphql({
  query: updateChat,
  variables: {
    input: {
      userId: user.userId,
      timestamp: chatTimestamp,
      chathistory: JSON.stringify(messageFeed),
    },
  },
  authMode: "userPool",
});
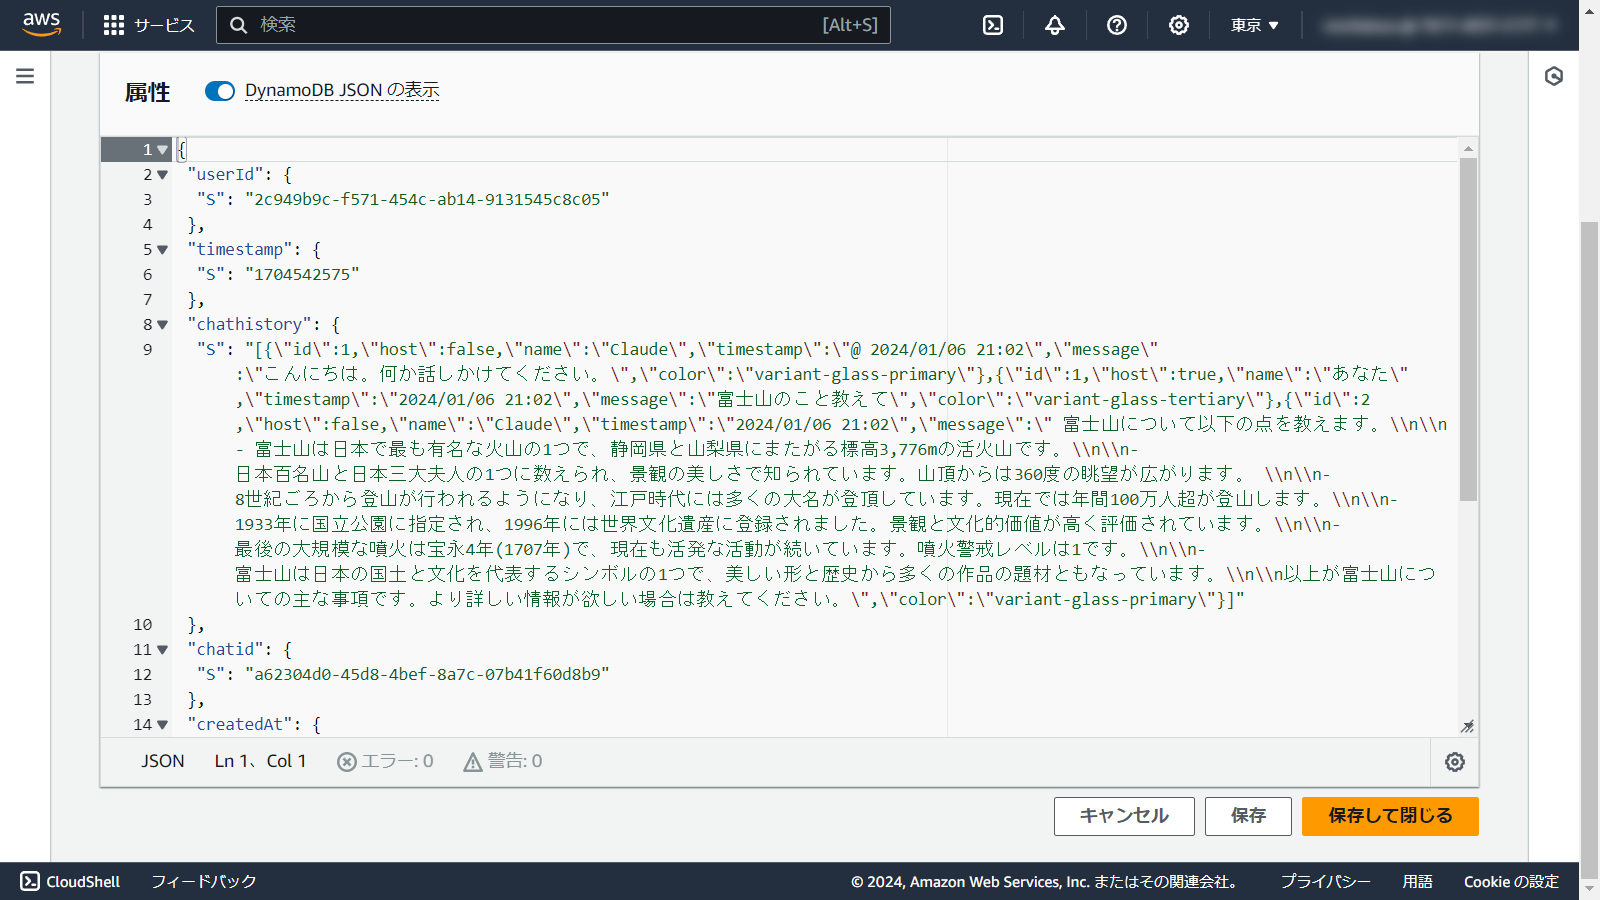
すごく雑ですが、messageFeedをそのまま永続化することに成功しました。これでブラウザウィンドウを閉じても会話が続けられます。
 注記
注記CognitoのuserIdをキーとしているので、PCとスマホでも同じIDでログインすれば会話が同期されます。
- ソースコード全体
https://github.com/moritalous/skeleton-chat/blob/main/src/routes/v3-persistence/%2Bpage.svelte
全3回に分けて、チャットアプリを作成しました。意外といい感じなものが作成できた気がしています。
https://github.com/moritalous/skeleton-chat
おまけ
以前作ったAgents for Amazon Bedrockのフロントエンドにすることも簡単でした!
https://qiita.com/moritalous/items/ef704e8aea9e65c0d019
-   import {
-       BedrockRuntimeClient,
-       InvokeModelWithResponseStreamCommand,
-   } from "@aws-sdk/client-bedrock-runtime";
+   import {
+       BedrockAgentRuntimeClient,
+       InvokeAgentCommand,
+   } from "@aws-sdk/client-bedrock-agent-runtime";
-   const client = new BedrockRuntimeClient({
+   const client = new BedrockAgentRuntimeClient({
-       region: amplifyconfig.aws_project_region,
+       region: "us-east-1",
        credentials: (await fetchAuthSession()).credentials,
    });

-   const params = {
-   modelId: "anthropic.claude-instant-v1",
-   contentType: "application/json",
-   accept: "*/*",
-   body: JSON.stringify({
-       prompt: `${history}\n\nHuman: ${prompt}\n\nAssistant:`,
-       max_tokens_to_sample: 1000,
-       temperature: 0.5,
-       top_k: 250,
-       top_p: 1,
-       stop_sequences: ["\n\nHuman:"],
-   }),
-   };
+   const params = {
+       agentId: agentId,
+       agentAliasId: agentAliasId,
+       sessionId: chatid,
+       inputText: prompt,
+   };

-   const command = new InvokeModelWithResponseStreamCommand(params);
+   const command = new InvokeAgentCommand(params);
    const response = await client.send(command);

    completion = "";
-   if (response.body) {
+   if (response.completion) {
        const textDecoder = new TextDecoder("utf-8");

-       for await (const stream of response.body) {
+       for await (const stream of response.completion) {
            const chunk = textDecoder.decode(stream.chunk?.bytes);
-           completion = completion + JSON.parse(chunk)["completion"];
+           completion = completion + chunk;

            // Smoothly scroll to the bottom of the feed
            setTimeout(() => {
                scrollChatBottom("smooth");
            }, 0);
        }
    }