2. Amazon EC2 の作成
- 作成者: moritalous
- 作成日: 2023/08/14
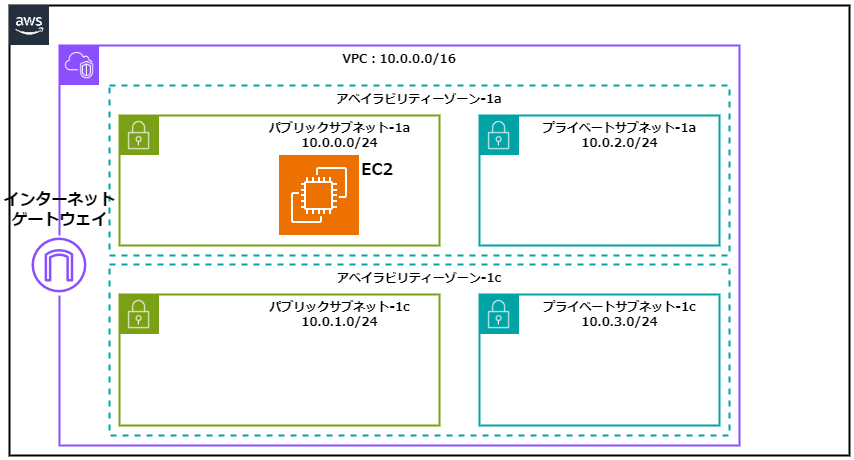
EC2を作成
続いてEC2を構築します。
参考:Instances
const instance = new ec2.Instance(this, 'EC2Instance', {})
必須パラメーターは以下の3つです
- VPC
- インスタンスタイプ
- AMI
t2.microタイプのAmazon Linux 2023を起動する場合はこのようになります。
const instance = new ec2.Instance(this, 'EC2Instance', {
  vpc: vpc,
  instanceType: ec2.InstanceType.of(ec2.InstanceClass.T2, ec2.InstanceSize.MICRO),
  machineImage: ec2.MachineImage.latestAmazonLinux2023(),
})
CDKで用意されているenumを参照することで実行時のtypoが防げます。また、AMI IDを調べなくても良い点もメリットです。
この状態で作成されるリソースは以下の通り
    Type: AWS::EC2::SecurityGroup
    Type: AWS::IAM::Role
    Type: AWS::IAM::InstanceProfile
    Type: AWS::EC2::Instance
セキュリティグループが作成されますが、インバウンドルールがないため、80番ポートへの通信許可設定を追加します。セキュリティグループによる許可/不許可設定を行うConnectionsというクラスが用意されています。
参考:Connections
const instance = new ec2.Instance(this, 'EC2Instance', {
  vpc: vpc,
  instanceType: ec2.InstanceType.of(ec2.InstanceClass.T2, ec2.InstanceSize.MICRO),
  machineImage: ec2.MachineImage.latestAmazonLinux2023(),
})

instance.connections.allowFromAnyIpv4(ec2.Port.tcp(80))
指定の仕方がプログラム言語っぽいですね。
追加で以下の設定も行います。
- パブリックサブネットに配置(デフォルトではプライベートサブネットに配置)
- パブリックIPアドレスを自動付与
- インスタンス名「webserver1-user1」を付与
const instance = new ec2.Instance(this, 'EC2Instance', {
  vpc: vpc,
  instanceType: ec2.InstanceType.of(ec2.InstanceClass.T2, ec2.InstanceSize.MICRO),
  machineImage: ec2.MachineImage.latestAmazonLinux2023(),

  vpcSubnets: {
    subnetType: ec2.SubnetType.PUBLIC
  },
  associatePublicIpAddress: true,
  instanceName: 'webserver1-user1'
})

instance.connections.allowFromAnyIpv4(ec2.Port.tcp(80))
UserData
リファレンスに沿って記述します。
まず、ユーザーデータで実行したいスクリプトを単体のファイルとして作成します。
#!/bin/bash

dnf update -y
dnf install -y httpd wget php-fpm php-mysqli php-json php php-devel mariadb105

wget http://ja.wordpress.org/latest-ja.tar.gz -P /tmp/
tar zxvf /tmp/latest-ja.tar.gz -C /tmp
cp -r /tmp/wordpress/* /var/www/html/
chown apache:apache -R /var/www/html

systemctl enable httpd.service
systemctl start httpd.service

yum install -y https://s3.amazonaws.com/ec2-downloads-windows/SSMAgent/latest/linux_amd64/amazon-ssm-agent.rpm
systemctl restart amazon-ssm-agent
このスクリプトをS3からダウンロードして実行するように構成します。
import { Asset } from 'aws-cdk-lib/aws-s3-assets';
const asset = new Asset(this, 'Asset', {
  path: './asset/install_wordpress.sh'
})

const localPath = instance.userData.addS3DownloadCommand({
  bucket: asset.bucket,
  bucketKey: asset.s3ObjectKey
})

instance.userData.addExecuteFileCommand({
  filePath: localPath
})

asset.grantRead(instance.role)
CDKのデプロイ時にassetとして指定したファイルがS3にアップロードされます。
addS3DownloadCommandとaddExecuteFileCommandによって、S3バケットからスクリプトをダウンロードして実行するユーザーデータが生成されます。
      UserData:
        Fn::Base64:
          Fn::Join:
            - ""
            - - |-
                #!/bin/bash
                mkdir -p $(dirname '/tmp/7e1d94933cfcfa503d1cd4e6582868b8451b8abe4146de48599be07d85b54ada.sh')
                aws s3 cp 's3://
              - Fn::Sub: cdk-hnb659fds-assets-${AWS::AccountId}-${AWS::Region}
              - |-
                /7e1d94933cfcfa503d1cd4e6582868b8451b8abe4146de48599be07d85b54ada.sh' '/tmp/7e1d94933cfcfa503d1cd4e6582868b8451b8abe4146de48599be07d85b54ada.sh'
                set -e
                chmod +x '/tmp/7e1d94933cfcfa503d1cd4e6582868b8451b8abe4146de48599be07d85b54ada.sh'
                '/tmp/7e1d94933cfcfa503d1cd4e6582868b8451b8abe4146de48599be07d85b54ada.sh'
grantReadはassetへの読み取り権限をインスタンスのロールに付与する定義です。この定義のみで以下のCloudFormationが生成されます。
- assetの格納されたS3への読み取り権限(
s3:GetBucket*、s3:GetObject*、s3:List*)を付与するIAMポリシーを作成 - EC2のInstanceProfileとして付与するIAMロールにIAMポリシーを付与
  EC2InstanceInstanceRoleBDF87973:
    Type: AWS::IAM::Role
    Properties:
      AssumeRolePolicyDocument:
        Statement:
          - Action: sts:AssumeRole
            Effect: Allow
            Principal:
              Service: ec2.amazonaws.com
        Version: "2012-10-17"
      Tags:
        - Key: Name
          Value: webserver#1-user1
    Metadata:
      aws:cdk:path: HandsonCdkStack/EC2Instance/InstanceRole/Resource
  EC2InstanceInstanceRoleDefaultPolicy2B4CD46D:
    Type: AWS::IAM::Policy
    Properties:
      PolicyDocument:
        Statement:
          - Action:
              - s3:GetBucket*
              - s3:GetObject*
              - s3:List*
            Effect: Allow
            Resource:
              - Fn::Join:
                  - ""
                  - - "arn:"
                    - Ref: AWS::Partition
                    - ":s3:::"
                    - Fn::Sub: cdk-hnb659fds-assets-${AWS::AccountId}-${AWS::Region}
                    - /*
              - Fn::Join:
                  - ""
                  - - "arn:"
                    - Ref: AWS::Partition
                    - ":s3:::"
                    - Fn::Sub: cdk-hnb659fds-assets-${AWS::AccountId}-${AWS::Region}
        Version: "2012-10-17"
      PolicyName: EC2InstanceInstanceRoleDefaultPolicy2B4CD46D
      Roles:
        - Ref: EC2InstanceInstanceRoleBDF87973
    Metadata:
      aws:cdk:path: HandsonCdkStack/EC2Instance/InstanceRole/DefaultPolicy/Resource
  EC2InstanceInstanceProfile4A6C6689:
    Type: AWS::IAM::InstanceProfile
    Properties:
      Roles:
        - Ref: EC2InstanceInstanceRoleBDF87973
    Metadata:
      aws:cdk:path: HandsonCdkStack/EC2Instance/InstanceProfile
CDK素晴らしいです!
Outputsセクション
CloudFormationのOutputsセクションを使用したい場合は、cdk.CfnOutputを定義します。
new cdk.CfnOutput(this, 'EC2PublicIP', {
  value: instance.instancePublicIp
})
CDKのデプロイコマンドが終了した際に値が出力されます。
Outputs:
HandsonCdkStack.EC2PublicIP = 54.249.172.197
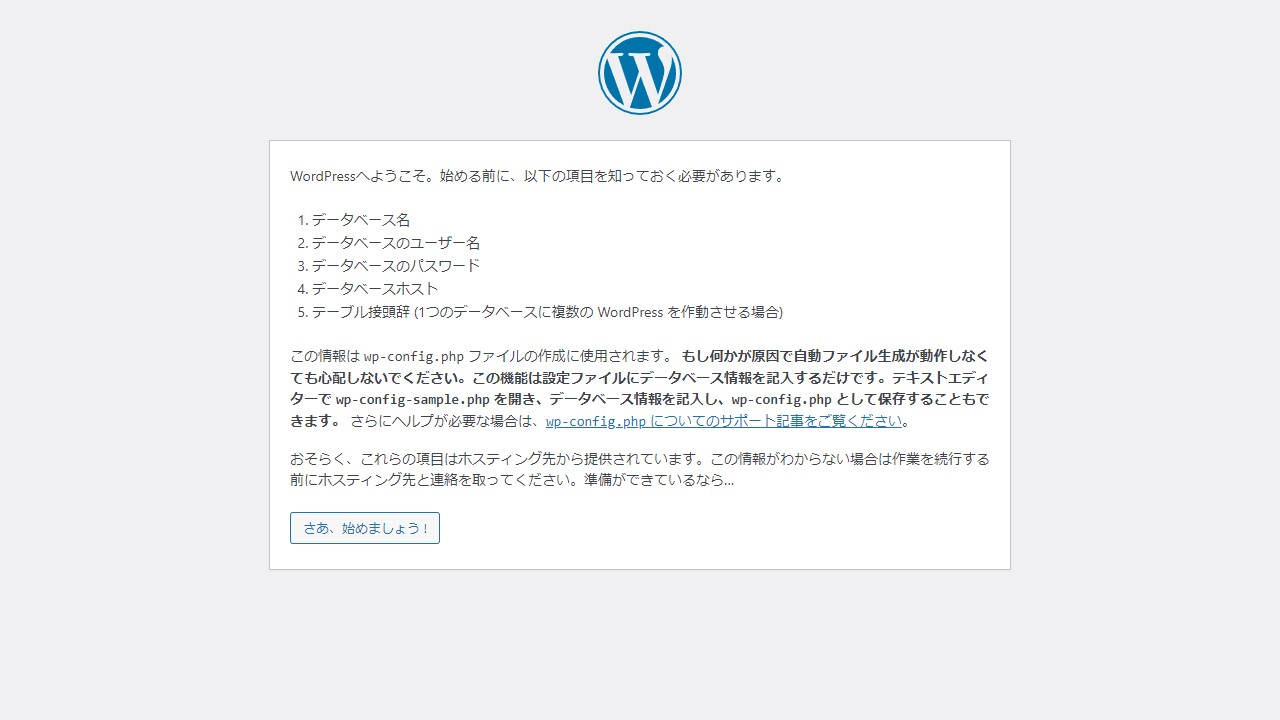
出力されたIPアドレスにアクセスし、WordPressのセットアップ画面が表示されることを確認してください。
EC2を作成してください。
- t2.microタイプ
- パブリックサブネットに配置
- パブリックIPアドレスを自動付与
- 80番ポートのインバウンド通信を許可
- ユーザーデータを使用してWordPressをインストール
- パブリックIPアドレスをOutputで出力
回答
import * as cdk from "aws-cdk-lib";
import { Construct } from "constructs";
// import * as sqs from 'aws-cdk-lib/aws-sqs';
import * as ec2 from "aws-cdk-lib/aws-ec2";
import { Asset } from 'aws-cdk-lib/aws-s3-assets';

export class HandsonCdkStack extends cdk.Stack {
  constructor(scope: Construct, id: string, props?: cdk.StackProps) {
    super(scope, id, props);

    // The code that defines your stack goes here

    // example resource
    // const queue = new sqs.Queue(this, 'HandsonCdkQueue', {
    //   visibilityTimeout: cdk.Duration.seconds(300)
    // });

    const vpc = new ec2.Vpc(this, "VPC", {
      natGateways: 0,
    });

    const instance = new ec2.Instance(this, 'EC2Instance', {
      vpc: vpc,
      instanceType: ec2.InstanceType.of(ec2.InstanceClass.T2, ec2.InstanceSize.MICRO),
      machineImage: ec2.MachineImage.latestAmazonLinux2023(),

      vpcSubnets: {
        subnetType: ec2.SubnetType.PUBLIC
      },

      associatePublicIpAddress: true,

      instanceName: 'webserver1-user1',

    })

    instance.connections.allowFromAnyIpv4(ec2.Port.tcp(80))

    const asset = new Asset(this, 'Asset', {
      path: './asset/install_wordpress.sh'
    })

    const localPath = instance.userData.addS3DownloadCommand({
      bucket: asset.bucket,
      bucketKey: asset.s3ObjectKey
    })

    instance.userData.addExecuteFileCommand({
      filePath: localPath
    })

    asset.grantRead(instance.role)

    new cdk.CfnOutput(this, 'EC2PublicIP', {
      value: instance.instancePublicIp
    })

  }
}
CloudFormationのテンプレートを記述するのに比べ、少ない労力でできることが体感できたと思います。